#react navbar
Explore tagged Tumblr posts
Visit Tumblr Blog
Explore Tumblr blogs with no restrictions, modern design and the best experience.
Last Seen Tumblr Blogs


Fun Fact
Women make up for the other 50% of Tumblr’s audience.
Text
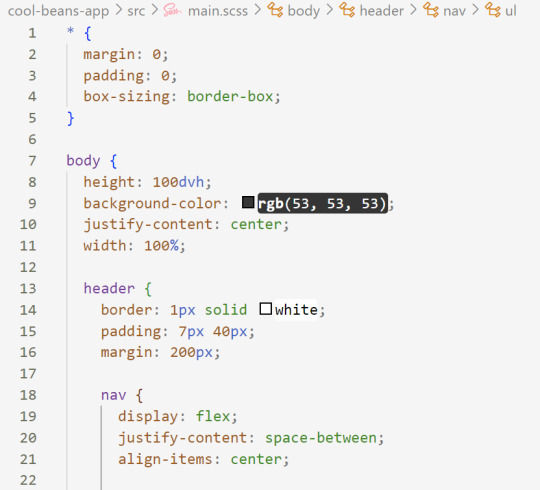
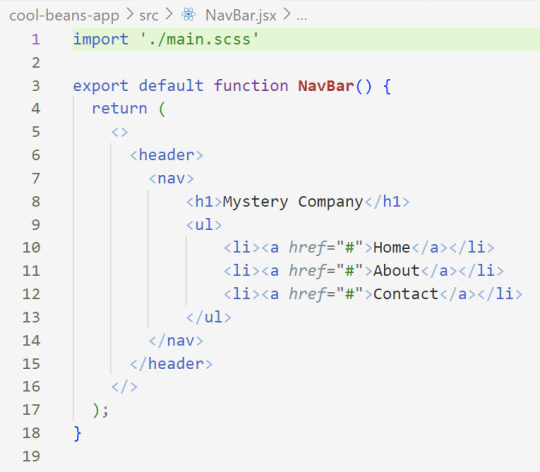
so today i messed around with react and managed to get this navbar working:

i looked at a tutorial the other day and tried to actually apply it to today....idk how to properly style the navbar so gonna try to figure it out next time if possible!
#so yea now i gotta learn more stuff hahahaha#on the brightside react looks really easy to work with once u start to get the hang of it#at least in comparison to what i was doing before!#and also i dont need my site to be super fancy right off the back#so im gonna just try to fix the navbar for a short while and then move to the next thing#which ig is the login page#the reason i started using react in the first place#my only issue is that the tutorial i used was really good but only the first part of it was free#and i dont have 150 dollars for a tutorial so.....#idk ig i have to look for another tutorial and hope its the same level of quality and also in typescript#cause the tutorial i was doing it in had it in typescript#also apparently its easier to write in than js....#anyways thats my progress today#see my character development from being reluctant about react to now being like...this is really useful#web development#codeblr#if yall have a good react tutorial that uses typescript...pls send it my way#im thinking ill have to start using next.js after this cause i need the backend stuff later#and it would save time ig??
3 notes
·
View notes
Video
youtube
Create a sidebar with submenu using ReactJS | Devhubspot
0 notes
Text
Hello beautiful people, please send me your favorite resources for web design and UI that doesn't suck. I'm working on my portfolio website and I refuse to use a template
#id like to pass as a fullstack dev (i do have sass and react experience) but im a backend person at heart so#i tried tailwind for 20 minutes today before noping out and building a shitty navbar by hand lol
0 notes
Text
4th February, 2024 TLDR: 📌read Chapter 3 of Grokking Algorithm 📌solved one leetcode problem on Binary Search 📌started a course on optimizing your LinkedIn profile 📌completed the navbar of my second project

Logic (Anything that has to do with programming & work will be explained under logic):
Earlier today I was trying to solve this leet code problem and i didn't figure it out because i was too tired but later found the answer and spent the next 1 hour trying to understand why i couldn't solve it --
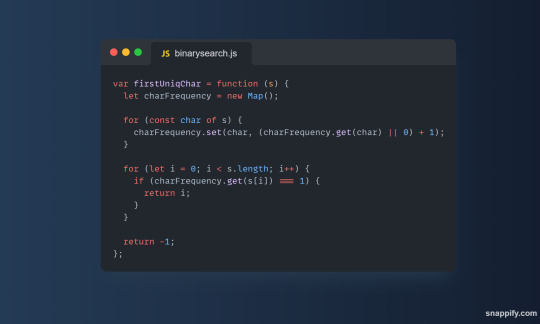
i thought of using maps but i didn't know how to update the maps but later found out how to but i always have that issue with updating an array to perform a particular task. I am also currently working on a project called Tubyte and I was able to complete the navbar to the project today and I am using Next, React for the frontend. It's a CMS, I will talk more on it later
14 notes
·
View notes
Text
Mini React.js Tips #5 | Resources ✨

Continuing the #mini react tips series, this time it's SCSS/SASS' time to shine! CSS is great and all but I am a SCSS girlie and I wanted to learn how to add SCSS files to my projects. It's a bit different to how to add CSS files to your project so heads up~!
What you'll need:
know how to create a React project >> click
know the default React project's file structure >> click
know how to create a component >> click
know basic SCSS or SASS
basic knowledge of using the Terminal

What The Project Will Look Like:

*very basic but just want some SCSS styling to prove that the tips work~!
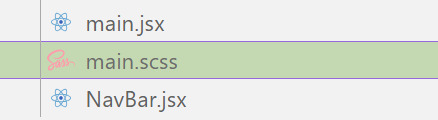
Big disclaimer: I have deleted all the code inside of the App()'s return() so that the default project is gone and the guide starts on a clean slate. I have also created a NavBar component beforehand as my testing component for this guide~!
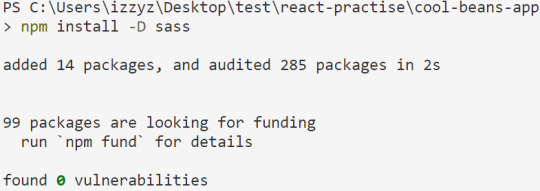
[ 1 ] Open Terminal And Install Sass: Launch the terminal within your project folder. Execute the following command to install Sass as a development dependency for your project:
npm install -D sass
[ 2 ] Create SCSS File: In the 'src' folder, create your SCSS file - it ends with .scss for SCSS files and .sass for SASS files. Feel free to organize it into subfolders for a structured project.
[ 3 ] Style Your SCSS: Open the newly created SCSS file and add your styles, take advantage of variables, nesting, and more. (This is not all of my SCSS code):
[ 4 ] Import SCSS in Component: In the React component file where you want to apply these styles, import your SCSS file at the top:
import './[location of you SCSS/SASS file]';
[ 5 ] Run the Development Server: Start your development server with the command in the Terminal (the 'Local' link) + make sure your component is in the App() in App.jsx:
npm run dev
Congratulations! You've successfully added SCSS/SASS to your React project~!
Resources:
BroCode's 'React Full Course for Free' 2024 >> click
How to use Sass in React with Vite >> click
Sass Tutorial for Beginners - CSS With Superpowers >> click
React Official Website >> click
🐬Previous Tip: Tip #3 Adding CSS files to your project >> click
Stay tuned for the other posts I will make on this series #mini react tips~!
#mini react tips#my resources#resources#codeblr#coding#progblr#programming#studyblr#studying#javascript#react.js#reactjs#coding tips#coding resources
11 notes
·
View notes
Text
25/09/2023 || Day 87
LeetCode
I started doing the questions on Stacks and couldn't figure out how they wanted me to implement it, so I opened up Eclipse and just implemented a Stack on my own from scratch. Still didn't technically solve the LeetCode implementation, but whatever, we can't win everyday.
FrontendMentor Space Tourism Website - Log #1
Officially got started on this project today and I spent 3 hours trying to get the header to look right. I don't think it would've taken me 3 hours to get that done, but I decided to use React Routing for this project and I had to figure out how the CSS and elements worked with routes. I finally have a somewhat decent header that's close to the original, so despite my struggles I did achieve something. Also, getting the navbar to have a blurred background ended up being a lot easier than I thought it would be. I guess I struggled in a previous project to do that, so it went a lot better this time. I gotta be careful though because I haven't made it responsive...I normally go mobile-first route when building the layout, and I haven't done that today, so tmr I'll switch gears and do that. I find it easier to work mobile-first anyways...
Here's a photo of what the header looks like. The background image changes depending on what tab you click on the header:

9 notes
·
View notes
Text
Tried Every Major AI Model for Frontend Coding Only One Truly Delivered.
Let’s face it. As web developers, we’re all chasing the dream of faster, smarter, and more efficient coding. After all, the clock’s ticking, and there’s always more to build. Enter AI. You’ve probably heard all the buzz—AI tools that promise to help us write code faster, debug smarter, and even suggest better practices.
So, I did what any curious developer would do: I tested every major AI model for frontend coding. The verdict? Only one truly delivered. Spoiler alert: it wasn’t the one you might expect.

Let’s break it down.
The AI Hustle: The Tools I Tested GitHub Copilot – The AI-powered sidekick that lives inside Visual Studio Code, claiming to write code for you based on context.
ChatGPT – The famous conversational AI that answers all your questions and generates code snippets on demand.
Tabnine – The autocomplete tool that promises to help you code faster by suggesting relevant code as you type.
Kite – More of a Python fan favorite, but I thought I’d give it a shot for frontend tasks.
IntelliCode (Visual Studio) – Microsoft’s answer to AI code suggestions, integrated right into Visual Studio.
GitHub Copilot: Feels Like Magic—Until It’s Not At first, GitHub Copilot felt like something straight out of a developer’s dreams. You start typing, and bam—there it is: a perfectly crafted function, just like you wanted. For straightforward tasks like creating forms, loops, or boilerplate code? Copilot is on fire.
But… here’s the kicker:
The Caveat: When things got more complex—like building dynamic React components, handling state, or trying to integrate with APIs—Copilot just couldn’t keep up. It would suggest solutions that didn’t align with my project’s unique needs.
Code Quality: While the code worked, I often found myself rewriting it. It wasn’t exactly best practice material.
Don’t get me wrong—if you're cranking out basic pages or static HTML, Copilot is your friend. But for anything more nuanced? Not so much.
ChatGPT: Close, But Missing the Magic Touch I was honestly pretty pumped to try ChatGPT for frontend coding. It could explain things, generate code snippets, and even walk me through complex concepts. Plus, it was fast. But… as much as I loved it for learning and brainstorming, there were some glaring problems:
The “Old-School” Problem: Sometimes, ChatGPT would suggest outdated methods or libraries that were no longer considered best practice. So while it was fast, it wasn’t always on the cutting edge.
Context? What’s That?: ChatGPT is fantastic at answering questions, but it’s like that friend who has one really good idea and sticks to it. If you’re trying to build something specific, like a responsive navbar with flexbox and media queries, it often needed a bit of extra clarification from me.
Here’s the thing: ChatGPT can absolutely help with quick fixes or answering questions about web development. But when I needed it to generate more complex, customized code? It wasn’t perfect.
Tabnine: Fast, But Feels Like Auto-Pilot Tabnine was the next tool I dove into. It’s designed to speed up your workflow by predicting what you want to write and giving you the perfect code snippet. When it worked, it was like a breath of fresh air.
The Speed Factor: For simple functions or repetitive CSS rules, Tabnine sped up my workflow dramatically.
The Problem: But the minute I started getting into custom JavaScript components or more involved frontend logic, Tabnine became… well, a bit too generic. It felt like I was getting the same suggestions over and over. The more unique or specific the task, the more irrelevant the suggestions became.
So yeah, Tabnine is great when you’re doing basic stuff. But when you need it to adapt to your project’s unique context? Not so much.
Kite: More Python, Less Frontend Now, Kite is a popular AI assistant for Python developers. But hey, why not try it for frontend, right?
Turns out, that was a bad idea.
Wrong Fit for the Job: Kite’s suggestions were often off-track when it came to JavaScript, React, or even CSS. It’s not that it was a bad tool; it’s just not built for the frontend world.
Learning Curve: The lack of deep web development intelligence meant that Kite often gave me Python-flavored suggestions that weren’t very helpful.
If you're coding in Python, Kite’s your jam. But for frontend tasks? It felt like I was trying to put a square peg in a round hole.
IntelliCode (Visual Studio): A Little Too C#-Centric IntelliCode is another tool that’s integrated into Visual Studio. It’s solid—if you’re a C# developer. But I was working with JavaScript and React. Here’s how it went down:
Solid, But Static: IntelliCode tried to help, but it mostly focused on C# coding patterns. When it did suggest something for JavaScript, it felt like it was trying to adapt to a framework it didn’t really understand.
Not Frontend-Friendly: The AI behind IntelliCode just didn’t seem to “get” the way frontend development works, especially with React or complex HTML/CSS layouts.
If you’re in the Microsoft ecosystem, IntelliCode will help, but it won’t make you a frontend wizard.
And the Winner Is… ChatGPT (With a Twist) Here’s the plot twist: ChatGPT came out on top.
But before you roll your eyes, let me explain.
Here’s Why ChatGPT Works:
It’s Flexible: ChatGPT adapts to your needs. Whether I needed help with React state management, CSS animations, or even troubleshooting a weird bug, ChatGPT could jump in and help.
It Explains, Don’t Just Autocomplete: The real beauty of ChatGPT is that it doesn’t just give you code—it explains it. I could ask it to explain the difference between useEffect and useLayoutEffect, and it would break it down for me.
Context-Aware: While it still has room to improve, ChatGPT is surprisingly good at understanding your project’s flow, especially if you’re clear about what you need.
Pro Tip: Don’t rely on ChatGPT to write your code from start to finish. Treat it like a coding assistant—ask for help when you’re stuck or need a quick answer, then tweak the code to make it your own.
Final Thoughts: AI Isn’t Here to Replace Developers (Yet) It’s clear that AI tools aren’t perfect—yet. GitHub Copilot speeds up basic coding, Tabnine is great for fast suggestions, and IntelliCode can help if you’re in the Microsoft world. But for frontend development, ChatGPT emerged as the true game-changer.
The secret? ChatGPT is not just a code generator—it’s a powerful assistant that can teach you, help you troubleshoot, and give you contextual advice. It can’t replace your creativity or problem-solving skills, but it can certainly amplify them.
So, what’s the takeaway here? If you’re serious about AI tools for frontend development, ChatGPT is your best bet. Embrace it, and let it be the sidekick you always wished for.
0 notes
Text
If you're looking for a responsive header in React and Tailwind with dark mode, a search card, and a profile section, you can find the code here. Feel free to copy it!
#react #tailwind #navbar #header
[Check it out here!](https://hightechsgyaan.com/post/react-and-tailwind-navbar)
1 note
·
View note
Text
React Router Installation and Configuration
A Comprehensive Guide to React Router: Installation and Configuration
React Router is an essential library for creating dynamic and navigable single-page applications (SPAs) in React. It enables developers to map different URLs to specific components, allowing users to navigate between pages without the need to reload the entire application. In this article, we will cover the installation and basic configuration of React Router, setting you up to create efficient and user-friendly web applications.
1. Why Use React Router?
React Router is widely used in React applications due to its flexibility and powerful features. It allows you to:
Manage Navigation: Seamlessly handle navigation between different components or pages.
Dynamic Routing: Create dynamic routes that respond to user inputs or interactions.
Nested Routes: Organize your application with nested routes, allowing complex UI structures.
Easy Redirection: Implement redirections and conditional rendering based on user actions or authentication status.
2. Installation of React Router
To start using React Router, you first need to install it. React Router has different packages for web and native applications. For web applications, you'll use react-router-dom. Follow these steps to install React Router in your React project:
Install React Router: Open your terminal in the root directory of your React project and run the following command:
npm install react-router-dom
Or if you're using Yarn: yarn add react-router-dom
Update Your React Project: Ensure that your React project is up-to-date with the latest versions of React and React DOM to avoid any compatibility issues.
3. Basic Configuration of React Router
Once installed, you can configure React Router in your application. Here’s how you can set up basic routing:
Import BrowserRouter: In your index.js or App.js file, import BrowserRouter from react-router-dom. This component wraps your entire application and enables routing.
import { BrowserRouter as Router } from 'react-router-dom';
Create Routes: Define your routes within the Router component using Route components. Each Route specifies a path and the component that should render when the path matches the URL.
import { Route, Switch } from 'react-router-dom'; import Home from './components/Home'; import About from './components/About'; function App() { return ( <Router> <Switch> <Route exact path="/" component={Home} /> <Route path="/about" component={About} /> </Switch> </Router> ); }
<Switch>: Ensures that only one route is rendered at a time.
<Route>: Defines individual routes; the exact prop ensures the route only matches the specified path exactly.
Linking Between Routes: To navigate between different routes, use the Link component from react-router-dom instead of traditional anchor tags.
import { Link } from 'react-router-dom'; function Navbar() { return ( <nav> <Link to="/">Home</Link> <Link to="/about">About</Link> </nav> ); }
4. Advanced Configuration
React Router offers advanced configurations, such as nested routes, route parameters, and programmatic navigation.
Nested Routes: To create nested routes, simply nest Route components within each other.
Route Parameters: Use parameters in paths to capture dynamic values from the URL.
Programmatic Navigation: Use the useHistory or useNavigate hooks to navigate programmatically within your components.
5. Conclusion
React Router is a robust tool for managing navigation in React applications. With simple installation and configuration, you can create a fully navigable single-page application. By understanding the basics of routing and how to implement them, you can enhance the user experience and create more dynamic web applications. As you become more familiar with React Router, you can explore its advanced features to further optimize your application’s navigation.
#reactjscourse#job support#react js online training#placement service#reactjs#reactnativecourse#web development#web design
0 notes
Text
bootstrap navbar react router
Creating a Bootstrap Navbar with React Router: A Step-by-Step Guide
Navigating through a React application seamlessly is essential for a smooth user experience. Integrating React Router with a Bootstrap navbar is an excellent way to create a functional and aesthetically pleasing navigation system. Here’s how to do it.
Step 1: Set Up Your React Project
First, make sure you have a React project set up. You can create one using Create React App if you don't have a project already.npx create-react-app react-bootstrap-navbar cd react-bootstrap-navbar npm install react-router-dom bootstrap
Step 2: Install Necessary Packages
To use Bootstrap with React, you need to install Bootstrap and React Router DOM.npm install react-bootstrap bootstrap react-router-dom
Step 3: Add Bootstrap CSS
Include Bootstrap CSS in your project by adding the following line to your src/index.js file:import 'bootstrap/dist/css/bootstrap.min.css';
Step 4: Set Up React Router
Configure React Router in your application. Create a src/components directory and add your page components there. For this example, let’s create three simple components: Home, About, and Contact.
src/components/Home.jsimport React from 'react'; function Home() { return <h2>Home Page</h2>; } export default Home;
src/components/About.jsimport React from 'react'; function About() { return <h2>About Page</h2>; } export default About;
src/components/Contact.jsimport React from 'react'; function Contact() { return <h2>Contact Page</h2>; } export default Contact;
Step 5: Create the Navbar Component
Now, create a Navbar component that will use Bootstrap styles and React Router links.
src/components/Navbar.jsimport React from 'react'; import { Navbar, Nav, Container } from 'react-bootstrap'; import { LinkContainer } from 'react-router-bootstrap'; function AppNavbar() { return ( <Navbar bg="dark" variant="dark" expand="lg"> <Container> <Navbar.Brand href="/">MyApp</Navbar.Brand> <Navbar.Toggle aria-controls="basic-navbar-nav" /> <Navbar.Collapse id="basic-navbar-nav"> <Nav className="me-auto"> <LinkContainer to="/"> <Nav.Link>Home</Nav.Link> </LinkContainer> <LinkContainer to="/about"> <Nav.Link>About</Nav.Link> </LinkContainer> <LinkContainer to="/contact"> <Nav.Link>Contact</Nav.Link> </LinkContainer> </Nav> </Navbar.Collapse> </Container> </Navbar> ); } export default AppNavbar;
Step 6: Set Up Routing
Configure routing in your main App.js file to render the appropriate components based on the URL.
src/App.jsimport React from 'react'; import { BrowserRouter as Router, Route, Routes } from 'react-router-dom'; import AppNavbar from './components/Navbar'; import Home from './components/Home'; import About from './components/About'; import Contact from './components/Contact'; function App() { return ( <Router> <AppNavbar /> <Routes> <Route path="/" element={<Home />} /> <Route path="/about" element={<About />} /> <Route path="/contact" element={<Contact />} /> </Routes> </Router> ); } export default App;
Step 7: Run Your Application
Start your development server to see your Bootstrap navbar with React Router in action.npm start
Open your browser and navigate to http://localhost:3000. You should see your navigation bar at the top of the page, allowing you to switch between the Home, About, and Contact pages seamlessly.
Conclusion
By following these steps, you’ve created a responsive and dynamic navigation bar using Bootstrap and React Router. This setup not only enhances the user experience with smooth navigation but also leverages the power of React components and Bootstrap's styling. Happy coding!
1 note
·
View note
Text
5 Best React Native Local Databases for App Development

React Native is a great way to develop apps for Android and iOS. It allows you to use JavaScript on the web and native code on mobile devices.
But what if you need to store data locally?
That's where these databases come in handy — they let you connect your application logic with an external database such as Firebase or Realm.
Here are the five best React Native local databases that React Native app development companies use for app development.
1. Realm
Realm is a mobile database. It supports both Object-relational mapping (ORM) and non-ORM usage. Realm is available for iOS, Android, and React Native.
Realm is a very fast database that syncs with the cloud to access your data from anywhere without worrying about losing it or having to pay for storage space on your device.
2. NativeBase
NativeBase is a mobile-first framework for developing cross-platform apps in React Native. It supports many components, including a Navbar, Tabbar, Button, and many more.
NativeBase is built on top of React Native, so it integrates with the best features of both frameworks.
3. Firebase Realtime Database
Firebase is a cloud-hosted database that provides real-time data syncing, offline access, and security features. Firebase Realtime Database is a perfect choice for many react native app developers to store data in apps effortlessly.
Firebase Realtime Database can be used for mobile apps, web applications, and IoT devices. It works well with these platforms because it's built on top of Google Cloud Storage.
4. DocumentDB by Google
Google's database, DocumentDB by Google, is open-source and free to use. It supports a flexible schema, indexes, and rich query language. This database can be hosted in the cloud or on-premises.
5. Realm Mobile Database
It is a mobile database that runs directly inside phones, tablets, and wearables. Created by the makers of Firebase, Realm provides a simple way to store your data in real time and sync across all devices.
Conclusion
React Native app development companies can greatly benefit from using these databases. If companies want to develop their own app using React Native, they should contact Zorbis. Zorbis is a leading React Native app development company. To learn more, visit https://www.zorbis.com/services/ to schedule a meeting with a team of experts.
0 notes
Text
Responsive React Sidebar Navigation
Responsive React Sidebar Navigation
Responsive React Sidebar Navigation Responsive React Sidebar Navigation is a React-based Vertical Navigation with customizing options. It can be used for all types of web applications like custom admin panel, project management system, admin dashboard, backend application. It’s lightweight and compatible with almost all major browsers and devices Features Built on pure React JS,JQuery not…

View On WordPress
#asidebar menu#asidebar navigation#bootstrap dropdown menu#bootstrap navigation#bootstrap sidebar menu#dropdown menu#dropdown menu react#mobile menu#Navigation#react dropdown menu#react navbar#React Navigation#react navigation bar#react sidebar menu#reactjs#sidebar menu
0 notes
Text
Create a Dropdown in React that Closes When Click Outside
Create a Dropdown in React that Closes When Click Outside
React library is easier to learn. But when building a UI, some use cases will make us stuck. Here, we are going to discuss such a use case. Creating a Dropdown in React that closes when click outside. Prerequisites I believe that you are aware of web development and have basic knowledge in the React.js library, using the packages in React projects, etc. Wha is our use case? A picture can…

View On WordPress
0 notes
Text
A Complete Guide To Choose The Best Hybrid Mobile App Development Framework
In the information era, business people require access to valuable data. Many business enterprises are trying to switch from different desktop sites to mobile apps to control online exposure. It helps in resolving crucial problems. Each business enterprise comes with other objectives and structure. Selecting the right customizable technology stack helps in paving the way to the success of the company.
The latest application development industry's revolution creates an emergence of different hybrid application frameworks. They come with additional functionality, applications and structure. With the rise of various innovative solutions, you will be successful in finding other technologies and tools necessary. As you go through this write-up, you will be capable of finding information about the different hybrid mobile application development frameworks:

Xamarin
It is recognized to be the Microsoft owned company located in San Francisco. Founded in the year of 2011, this specific company comes with different cross-platform implementations of Common language specifications and Common Language Infrastructure. Such tools offer an opportunity to the developers in using similar code for various operating systems, like Windows, Android, MacOS, to name a few.
Xamarin provides a native-like experience within the application. So, it is recognized to be aesthetically sound. Xamarin provides a suitable opportunity to the developers in reusing the functions, tools, and code, which plays an integral role in making the process really quick. It helps in saving a good time during the application development process.
Ionic
It is recognized to be one of the top hybrid application development frameworks, which is bulged during the application development process across various companies, owing to different attributes. This framework provides an opportunity to the developers in creating cross-platform applications with the least effort. Also, it assures the native-like experience to the potential audience.
The potential audience offers assistance from the React Native community. This specific framework is not recommended to beginners. This specific vast community provides a suitable opportunity for diving in and exploring.
Sencha Touch
It contributes to being the enterprise-grade product, which helps create different end-to-end mobile web applications with JavaScript and HTML5. It is believed to be a specific platform, which is available for different business enterprise. It is equipped with different products, which work with Sencha Touch hand to touch. Here, the majority of the products are known to carry the heavier price tag.
Sencha Touch provides the native look and feel, across different platforms. It provides support to the drag and drops HTML5 visual app builder, with a plethora of ready to use templates. It comes with a plethora of components, which are added and built to the specific library for reuse across different applications.
Onsen UI
It is a popular open-source framework that has become widely popular in developing mobile applications quickly. It is based on different framework-agonistic UI components, which provide a suitable opportunity to make choices and switch among different frameworks.
Onsen provides a plethora of ready to use components in different tremendous numbers. It offers support to mobile application development solutions through JavaScript and HTML5. It is believed to be an excellent choice for the application developers to use this flexible and user-friendly framework. It comprises different semantic markup components, free to use for different kinds of commercial projects.
Appcelerator Titanium
Titanium is regarded as a useful and interesting framework with different mixed development environments supported by PhoneGap and Xamarin. You should make use of the Appcelerator's API and customized XML for supporting different native features. Here, the Titanium cross-platform provides support to the Apple and Android platforms.
The application, which is created with JavaScript, provides support to improved performance for different hybrid apps. The SDK of Titanium comes with a plethora of APIS and cloud services mobile platforms. So, it is possible to use tthe application in the back end. It is equipped with different platform-independent APIs, owing to which it becomes easy to get access to the phone hardware.
Framework 7
It is believed to be a wonderful choice for different iPad app development service. This specific framework provides the sound selection of various components. It provides support to different themes for other platforms, which are designed excellently. It is known to mesh properly with different native controls. This specific technology comes with various advanced features, which are necessary to create the cross-platform breakthrough mobile application.
Mobile Angular UI
It is recognized to be a popular open-source framework, which provides a suitable opportunity to create mobile application experiences. There is no dependency on the jQuery and different Boostrap libraries. In addition to this, there are a plethora of UI components, such as switches, scrollable areas, overlays, navbars, so that the developers can create seamless mobile apps. The potential audience can procure an attractive, intuitive, and smoother user interface.
PhoneGap
PhoneGap is one of the leading hybrid application development frameworks. It provides the suitable oppurtunity to the developers in leveraging similar code for various platforms. So, the developers should use the already existing knowledge of web development, which helps create different apps faster, which are supported by different mobile operating systems.
With the prerequisite knowledge of JavaScript, CSS and HTML, you can offer a helping hand in developing PhoneGap applications. Integration of this specific tool into different processes will be stunning the world.
Kendo UI
Kendo UI contributes to being the HTML framework, which provides a prerequisite opportunity to the cross-platform mobile app development, which Telerik powers. This technology depends on jQuery, after which it is powered with more than 70 jQuery widgets.
It provides a suitable opportunity to the developers in integrating it with BootStrap and Angular UI frameworks. Kendo UI is very easy to learn. Although this framework is open and free source, there are some restrictions in the features for working.
The market provides a plethora of options. If you are willing to make the prerequisite choice, it is essential to analyze the needs, after which you need to draft the image of the potential audience.
1 note
·
View note
Link
2 notes
·
View notes
Text
Coding Tutorial: How to create add a bootstrap navbar to my website
Adding a Bootstrap Navbar to an HTML website is an easy way to make your website functional and cool. Bootstrap is a CSS library and has great styles for HTML, Javascript libraries like react and more. Step 1: Lets start with creating a html page. Open up Visual Code Studio, or your favorite code editor. When opened, create a new file, call it index.html. Save the file in it’s own…

View On WordPress
0 notes